57 744 läst · 367 svar
58k läst
367 svar
Installera bergvärme själv?
Hängde inte med på shuntstyrningen, det sköter sig självt antar jag? Så skulle jag vilja ha det - när acktanken är laddad av sol lr ved så vill jag ta värmen därifrån.
Tjatar lite om det där röret men är det perforerat med massa små hål <10mm eller färre större hål?
Tjatar lite om det där röret men är det perforerat med massa små hål <10mm eller färre större hål?
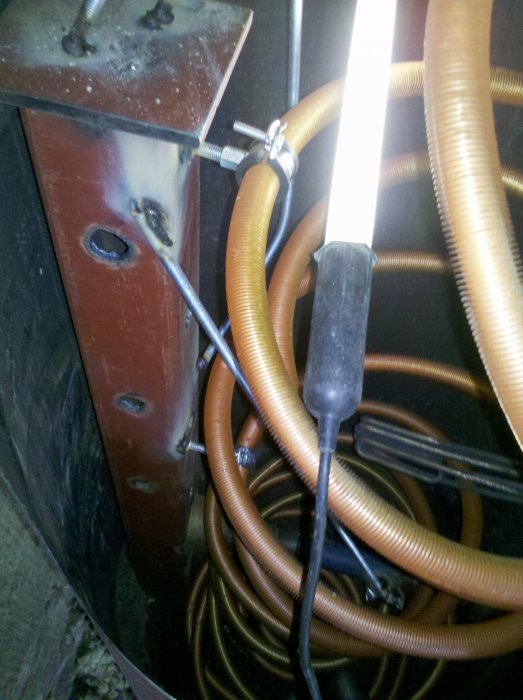
Ja shunt styrningen och vp sköter sig själv stoppar vid varm tank och startar själv när tanken kallnar. Kommer inte ihåg dia på hålen men skar dom med gas och gissar på 25 mm bifogar en bild där man ser att vkr röret sitter på sidan och inte i mitten som jag skrev tidigare man ser även röret det blå i botten med en kona på innan det går in i vkr röret för låg flödes hastighet och liten omrörning i tanken. Byggde av diverse skrot jag hade liggande men det funkar bra.

Inloggade ser högupplösta bilder
Logga in
Skapa konto
Gratis och tar endast 30 sekunder
Bergvärme får du installera själv, men handläggarna har ibland lite dålig koll och drar alla värmepumpar över en kam (de där du måste installera kylmedia krävs certifiering).
Med andra ord fyller du bara i ditt eget namn som installatör. Det gjorde jag och det var inga problem. Borrfirman brukar kunna hjälpa till att fylla brine, det är värt pengarna att slippa slafsa med det.")
Med andra ord fyller du bara i ditt eget namn som installatör. Det gjorde jag och det var inga problem. Borrfirman brukar kunna hjälpa till att fylla brine, det är värt pengarna att slippa slafsa med det.
Tack så mycket!mexitegel skrev:
Bergvärme får du installera själv, men handläggarna har ibland lite dålig koll och drar alla värmepumpar över en kam (de där du måste installera kylmedia krävs certifiering).
Med andra ord fyller du bara i ditt eget namn som installatör. Det gjorde jag och det var inga problem. Borrfirman brukar kunna hjälpa till att fylla brine, det är värt pengarna att slippa slafsa med det.
Det gick bra med bygglovet. Nu vill jag planera installationen. Jag har köpt en Bosch Compress 7001i. Det ser ut att det finns två val till värmesystem. Ett "standard" och ett med "bypass" och cirkulationspump. (https://www.vvsbutiken.nu/dokument/install_cs7001i_lwm.pdf, sidan 42 och 44).
Mitt pelletspanna hade ett cirkulationspump och ett motorized ESBE regleringsventil, och jag undrar om jag kan installera systemet utan cirkulationspump och regleringsventil. Huset är ett 1-plan villa med 136 km och golvvärme.
Mitt pelletspanna hade ett cirkulationspump och ett motorized ESBE regleringsventil, och jag undrar om jag kan installera systemet utan cirkulationspump och regleringsventil. Huset är ett 1-plan villa med 136 km och golvvärme.
I am writing in English, the forum managers can delete if this is not allowed.
We have a 140 sqm villa in Western Sweden, on a plot of land slightly under 800 sqm. The house, built in 1989, had a pellets burner, installed in 2006.
Due to the slope, (sutterang) the garage is located under the house, and the Pellets burner was placed inside a small room with fire protection door at the end of the garage. Since our purchase of the house, we had many problems with the pellets’ burner. The most important was that due the poor air access, soot and gasses from burning came back to pellets storage, condensing into some form of asphalt and gluing together pellet’s dust to the burner’s components (driving screws, etc.) or clumping pellets together, causing stoppage. As I was less experienced, Initially I remedied many of these problems by cleaning. Later, considering the root cause of these problems, I tried to remedy them by improving air access to the pellets burner. I added a channel that brought fresh air close to the burner, added external air ducts from the sides of the garage to improve the air access and these solutions helped to some extent. I also set the exhaust bypass to the default 6 mm and this greately improved the quality of burning.
Considering the reliability issues, rising price of the pellets in recent years, the need for pellets storage, cleaning and repairing, I finally got tired and decided to install a geothermal (Bergvärme) BV system.
Two companies gave me offers of installation, one 190 kkr, and another 160 kkr, both with 190 m deep well and IVT 512 greenline värmepump.
The more expensive solution wanted to drill in the yard behind the house and draw long lines under the lawn. The cheaper option wanted to dig in front of the garage and go directly towards the garage (at the end of which, the pellets burner was located). Meanwhile, I got estimates for the well and the machine. I somehow concluded that I would save a lot of money if I did the purchase and installation separately and ordered a VP.
Planning
I started the work by trying to file a bygglov application to the city. I had a neighbor that basically lives in an apartment and uses his property as a summer house. It was rather difficult to find him, until I spotted him by chance one-day. I leaned the value of keeping a phone list of neighbors in a 25 m radius.
After that, to fill the application, I felt that I needed to include an installation firm’s name in addition to the drilling firm. The forms also wanted a name for the electrical firm. I could not find any installer that could agree on my own, but the drilling firm had someone who agreed to do the installation. I also found a general purpose industrial electrical installation firm that agreed to do the electrical work and I put their name in the application too.
I got a response from the application rather early (I was expecting 6 weeks, the max mentioned in the city’s website), but I got an approval in two weeks approximately.
Selecting the well’s position
I don’t know how strict the rules are for the positioning, but I had three constraints:
· The well should be 10 m inside the property.
· The distance from neighbor BV well should be 20 m (there was none), and the distance with neighboring water wells should be 30 m. I had a neighbor with a well.
· The distance from the well to the building should be more than 4 m.
To find a position, I downloaded a map of the property from the city’s map software and used offset tool offset the borders of the property and the building to find a suitable position. The only place with some access to the drilling machine was located in a section which was 7 m inside the property, but there was a 6 m road between our property and the neighbor’s, so the city agreed to the position.
I printed the position, showed it to the neighbors along with a form that I had downloaded from another kommun, (Ekerö kommun). Majority of neighbors signed it directly. The neighbor with a water well indicated the existence of the water well on the map, but I could show in my CAD drawings that the distance was more than 30 m.
Preparation for drilling
In preparation for drilling I built a sand ram so the machine (9 tonns of steel) could crawl into the property (I used the sand from digging a test hole on the path of the pipe).
Drilling
Drilling team arrived at 8 AM, did the drilling by adding 6 m sections of pipe to the hungry drilling machine and finished almost at 3pm. They inserted the pipes for KB into the well and, left me two 90° connections from Plasson and told me how to connect them the pipes that carry KB to the building after the trench was prepared.
Installation
Initially I was hoping that the company that was introduced by the drilling firm to do the piping. They had not given me a firm price/date and after the drilling, they told me that they could not do the piping because of their employees were going in parental leave. I found a company locally that gave me an estimate of 50 000 kr, (20 000 kr for the material and 30 000 kr -20 000 after ROT- for the labor). At that time-expecting a 20-30 000 kr installation- I declined the offer, thinking that it was too expensive.
I then contacted 6 installators recommended by BVP manufacturer around my area but none responded. One of them explained that they would not do a project if they did not buy the parts for it.
I had not done any big scale piping work before, while I had some good experience in tinkering with cars, (the most difficult project for me before was changing a timing belt on a Mitsubishi engine). I also had soldering experience from electronics. To make a dull Corona-summer interesting, I decided to do the project myself. I first bough a Rems hot-dog 2 soldering gripper, and made up a shopping list. My initial plan was to buy form https://www.jtmplumbing.co.uk/ as their price for the copper pipes and insulation was almost the half/third of the Rinkabyrör; however, they told me that they could not ship me the pipes, and in addition, the shipping would cost 700 kr, so I dropped the idea and ordered a long shopping list from RR.
CAD
I used cad to decide the length of pipes and isolation that I needed to buy, the routing for the pipes and the positioning of the pipes. I think this was a helpful step for me to do this, but as you can guess, I ended up modifying some aspects in the reality. I am not sure what software is used by professionals, but I used a general purpose CAD software for mechanical engineering.
What was included in the package with the BVP
I got the expansion thank for the KB, pressure gauge, and the pressure relieve valve for the KB, a filter-valve for the return of the heating system and temperature sensors (one for outside, one for the heating system’s outgoing pipe). Most importantly, it included a filling station with its insulation.
Soldering or pressed connections
Today, pressed connection is rather universally used by professional installers. It is fast, the results are shiny, it is not affected by the presence of water in the pipes (in contrast to soldering), and the expensive hardware is justified for a business with multiple projects.
I mainly chose soldering since:
· I was not completely aware of the difficulties of soldering.
· I wanted a solution that I could keep with me after the installation at a reasonable cost.
· I had limited trust in press fitting that seal using a rubber O-ring. Even though I could not find any evidence/ground for doubts about the life of press-fittings, deep down I prefer a concept that is fully metal (such as soldering) over a design that mixes in polymers/rubbers.
· As a bonus, the joints for soldering are cheaper than those for compression. (e.g. 20 kr vs. 60 kr for a 90 bend in 28 mm).
If you can easily buy a good second-hand press tool (e.g. for 4000 kr), maybe that is a solution worth choosing.
Fixing Pipes
I connected the pipes to a concrete wall and the wood joists on the roof, using iron profiles (takjärn). For screws, I found the “SKRUVSTIFT M8X80, Art. 87-797” from Biltema a good choice for installing the takjärns or directly connecting the pipe clamps.
For the KB pipes, I used 10 pieces of isolated pipe clamps from Billigvvs. They were expensive, but I feel safer against the condensation. For other pipes (around ball valves and filters), I used regular clamps with M10 studs that I cut to length with my tiger saw.
Filling and pressurizing the KB system
I failed to locate/rent a refilling station, therefore I picked up a submersible pump from Jula. I picked up the most powerful one (10 m head, 1 kW power) from their non-stainless steel range. I also bought 5 m of blue flat pipe material. The pump worked perfectly and the pipe fits the 3/4 filling station; however, 10 m head of water is equal to 1 bar, thus, to reach the 2.5 bar pressure, the installation manual from Bosch recommends a submersible pump with a head of 60 m, which I think mean an expensive and big submersible pump. A solution that I found was to pressurize the system by connecting a water hose (with a 3/4” Krankoppling) directly to the filling section and open the water until it reached the needed pressure (2.5 bar). The amount of water added will be equal to the compression of the expansion tank and negligible expansion of the pipes due to the pressurizing (i.e. negligible).
What would I do differently if I knew what I know today?
1. Would not spend too much time on calculating the number of needed joints. An estimated number x 2 + some alternative types (45 degree, male female, tight bend) (maybe four of each) would work fine. (you need three 90°bends to bring any given output to any given input). You can then return the unused items (at Hornbach or Rinkaby rör) after the project.
2. I made some solid sections of pipe (about 8 meters long). I think it would be more easy to make them or correct them if I had divided them into two sections by using compression coupling type valves or connectors.
3. I used long neck valves for the piping of the KB. I think the regular valves will work just fine (however, pay attention to buy something that is rated for -20°C).
4. Soldering needs complete separation from water for successful joints. Even water far away from the joint, can warm up, become steam and affect the joint. The best practice in my opinion is to separate the soldered sections from the water containing sources (e.g. heating circle, refilling line, etc..) and connect to water holders only with compression coupling. This will however need precision or room for play in the sections that you solder separately.
5. I would have brought the KB lines closer to the BVP by digging a longer trench outside of the house. I have rather long KB pipes inside that both did cost more to built and insulate and they take wall space that could be used for storage or other uses.
6. I would have ordered a 25 liter jug of concentrated KB liquid (ethanol mix) from the vvsbutiken along with the BVP. Other stores, such as RR also have KB liquid, but they don’t ship (only store-pickup).
7. I would have picked up the copper pipes myself from Hornbach or have bought it from Rinkabyrör instead of using Hornbach’s order and pickup. I got very scuffed-up pipes that seemed to be left-overs. This was annoying considering the price that I paid (about 2700 kr). I probably could have refused them on the spot or returned them when I noticed they were not good, but I don’t live very close to Hornbach and it was not easy for me.
8. I would have bought a good pipe cutter (I used Ridgid’s ratcheting one, but from Amazon) from the beginning, instead of starting the project with Biltema’s Chineseium.
9. The drilling company could have done the trench/drilling of the building wall for 3500 kr. I think I should have left this to them (although this meant waiting probably longer for them to find a suitable time in their schedule).
10. Although the ground was filled and soft, the trench kept getting wider when I tried to dig it with a showel/wellbarrow. I wonder if my life would have been easier if I had rented a small excavator.
11. Considering the amount of time that it took me to understand parts, select them and buy them, it probably would have been a good idea to take the 160 000 kr offer . An installer probably will keep the parts in his (or her… ) truck as standard, and will not need to think much about choosing them. While piping is an amazing skill, I don’t think that I would use it very often. All in all, this was an amazing project but it was time consuming.
Best Tools:
RIDGID 32573 Model 118 2-in-1 Close Quarters AUTOFEED Cutter with Ratchet Handle, 1/4-inch to 1-1/8-inch Tubing Cutter
After making spirals with my Biltema tube cutters, (and even resorting to my angle grinder and tiger saw to cut tubes), I bought this magnificent tool. You just need to position it on the tube, turn the black knob two turns, and then crank on the ratcheting handle. The tube will be cut in no time. I had in my mind to remove the inner cutter for the use in tight spaces, but I have not used it yet, as the ratcheting mechanism allows you to cut a pipe from a limited access angle. Of course, one could skip the ratcheting and cut the pipe with a continuous rotation.
I totally regret not buying this tool earlier.
Biltema’s burr remover
There is a video on youtube that shows that it is important to remove inner and outer burrs from cut pipes otherwise they can reduce the life of the copper pipes. I had bought a plastic round remover with three teeth from amazon, but it was a total garbage and it actually plastically deformed the corners rather than creating chamfers. I shelled out 80 kr and bought a simple pensile-like deburring tool from Biltema (Art. 20-327) which worked beautifully.
Biltema’s Plaströrsax Art. 12-195
Did a good job of cutting PE pipes for KB. It is also useful for cutting other pipes, such as electrical conduits.
Rems hot-dog 2
This was my workhorse that did all the soldering. It is a bit pricy, (cheaper used), and I don’t know If I should keep it or sell it. It did not have problem in heating the joints for soldering (if there was no water around).
One should always use gloves when soldering, as molten solder droplets may injure your skin.
I see that Hornbach sell cheaper burners for soldering, and they may be alternative options to this electrical system.
The original Bahco -Stockholm Swedish pipe wrench
To tighten the compression couplings (on the PP-copper) I had bought a 15” adjustable wrench from Jula for 150 Kr since my existing 12” inch wrench was not sufficient for >45 mm nuts on these couplings. I needed a second big wrench and Biltema had sold out its 18” wrenches, so I borrowed my neighbor’s big adjustable wrench (he had inherited it from his dad!). This was a big help as it was easily adjustable and very firm in gripping. (https://en.wikipedia.org/wiki/Bahco#/media/File:J_P_Johansson_1940.jpg)
I may buy something similar for myself (I will do so if I return the left-over parts).
Rotary hammer
I got a second-hand rotary hammer in the middle of the project. It was totally worth the price and helped me to drill needed installation holes, in addition helped me in demolition of some unneeded walls and sections later. If you are my type of person, you should get one for yourself. I had a drill with impact action, but the performance is completely different.
Finishing the project
I first soldered and pressure tested the KB pipes with my compressor. After that, I asked a friend to help me. He came Saturday, 8 AM, and we removed the pellets burner. I had a palltruck and positioned the BVP (300 Kg) close to its final position. The most difficult thing was to move it to its final position. We finally muscled the BVP to a suitable position. We had to cut the cold water for half a day. Then we pushed on soldering the joints. By Sunday evening I was almost finished the bigger parts. Obviously after removing the pellets we did not have hot water. I kept fixing remaining parts and filled the system with KB fluid and pressurized the system. I also fixed the electrical connection (We had 20 A three-phase for the Pellets burner) and the connection to the outside sensors. overall, it took me a week to finish everything and the first shower with BV heating was particularly amazing (after a cold shower few days earlier
We have a 140 sqm villa in Western Sweden, on a plot of land slightly under 800 sqm. The house, built in 1989, had a pellets burner, installed in 2006.
Due to the slope, (sutterang) the garage is located under the house, and the Pellets burner was placed inside a small room with fire protection door at the end of the garage. Since our purchase of the house, we had many problems with the pellets’ burner. The most important was that due the poor air access, soot and gasses from burning came back to pellets storage, condensing into some form of asphalt and gluing together pellet’s dust to the burner’s components (driving screws, etc.) or clumping pellets together, causing stoppage. As I was less experienced, Initially I remedied many of these problems by cleaning. Later, considering the root cause of these problems, I tried to remedy them by improving air access to the pellets burner. I added a channel that brought fresh air close to the burner, added external air ducts from the sides of the garage to improve the air access and these solutions helped to some extent. I also set the exhaust bypass to the default 6 mm and this greately improved the quality of burning.
Considering the reliability issues, rising price of the pellets in recent years, the need for pellets storage, cleaning and repairing, I finally got tired and decided to install a geothermal (Bergvärme) BV system.
Two companies gave me offers of installation, one 190 kkr, and another 160 kkr, both with 190 m deep well and IVT 512 greenline värmepump.
The more expensive solution wanted to drill in the yard behind the house and draw long lines under the lawn. The cheaper option wanted to dig in front of the garage and go directly towards the garage (at the end of which, the pellets burner was located). Meanwhile, I got estimates for the well and the machine. I somehow concluded that I would save a lot of money if I did the purchase and installation separately and ordered a VP.
Planning
I started the work by trying to file a bygglov application to the city. I had a neighbor that basically lives in an apartment and uses his property as a summer house. It was rather difficult to find him, until I spotted him by chance one-day. I leaned the value of keeping a phone list of neighbors in a 25 m radius.
After that, to fill the application, I felt that I needed to include an installation firm’s name in addition to the drilling firm. The forms also wanted a name for the electrical firm. I could not find any installer that could agree on my own, but the drilling firm had someone who agreed to do the installation. I also found a general purpose industrial electrical installation firm that agreed to do the electrical work and I put their name in the application too.
I got a response from the application rather early (I was expecting 6 weeks, the max mentioned in the city’s website), but I got an approval in two weeks approximately.
Selecting the well’s position
I don’t know how strict the rules are for the positioning, but I had three constraints:
· The well should be 10 m inside the property.
· The distance from neighbor BV well should be 20 m (there was none), and the distance with neighboring water wells should be 30 m. I had a neighbor with a well.
· The distance from the well to the building should be more than 4 m.
To find a position, I downloaded a map of the property from the city’s map software and used offset tool offset the borders of the property and the building to find a suitable position. The only place with some access to the drilling machine was located in a section which was 7 m inside the property, but there was a 6 m road between our property and the neighbor’s, so the city agreed to the position.
I printed the position, showed it to the neighbors along with a form that I had downloaded from another kommun, (Ekerö kommun). Majority of neighbors signed it directly. The neighbor with a water well indicated the existence of the water well on the map, but I could show in my CAD drawings that the distance was more than 30 m.
Preparation for drilling
In preparation for drilling I built a sand ram so the machine (9 tonns of steel) could crawl into the property (I used the sand from digging a test hole on the path of the pipe).
Drilling
Drilling team arrived at 8 AM, did the drilling by adding 6 m sections of pipe to the hungry drilling machine and finished almost at 3pm. They inserted the pipes for KB into the well and, left me two 90° connections from Plasson and told me how to connect them the pipes that carry KB to the building after the trench was prepared.
Installation
Initially I was hoping that the company that was introduced by the drilling firm to do the piping. They had not given me a firm price/date and after the drilling, they told me that they could not do the piping because of their employees were going in parental leave. I found a company locally that gave me an estimate of 50 000 kr, (20 000 kr for the material and 30 000 kr -20 000 after ROT- for the labor). At that time-expecting a 20-30 000 kr installation- I declined the offer, thinking that it was too expensive.
I then contacted 6 installators recommended by BVP manufacturer around my area but none responded. One of them explained that they would not do a project if they did not buy the parts for it.
I had not done any big scale piping work before, while I had some good experience in tinkering with cars, (the most difficult project for me before was changing a timing belt on a Mitsubishi engine). I also had soldering experience from electronics. To make a dull Corona-summer interesting, I decided to do the project myself. I first bough a Rems hot-dog 2 soldering gripper, and made up a shopping list. My initial plan was to buy form https://www.jtmplumbing.co.uk/ as their price for the copper pipes and insulation was almost the half/third of the Rinkabyrör; however, they told me that they could not ship me the pipes, and in addition, the shipping would cost 700 kr, so I dropped the idea and ordered a long shopping list from RR.
CAD
I used cad to decide the length of pipes and isolation that I needed to buy, the routing for the pipes and the positioning of the pipes. I think this was a helpful step for me to do this, but as you can guess, I ended up modifying some aspects in the reality. I am not sure what software is used by professionals, but I used a general purpose CAD software for mechanical engineering.
What was included in the package with the BVP
I got the expansion thank for the KB, pressure gauge, and the pressure relieve valve for the KB, a filter-valve for the return of the heating system and temperature sensors (one for outside, one for the heating system’s outgoing pipe). Most importantly, it included a filling station with its insulation.
Soldering or pressed connections
Today, pressed connection is rather universally used by professional installers. It is fast, the results are shiny, it is not affected by the presence of water in the pipes (in contrast to soldering), and the expensive hardware is justified for a business with multiple projects.
I mainly chose soldering since:
· I was not completely aware of the difficulties of soldering.
· I wanted a solution that I could keep with me after the installation at a reasonable cost.
· I had limited trust in press fitting that seal using a rubber O-ring. Even though I could not find any evidence/ground for doubts about the life of press-fittings, deep down I prefer a concept that is fully metal (such as soldering) over a design that mixes in polymers/rubbers.
· As a bonus, the joints for soldering are cheaper than those for compression. (e.g. 20 kr vs. 60 kr for a 90 bend in 28 mm).
If you can easily buy a good second-hand press tool (e.g. for 4000 kr), maybe that is a solution worth choosing.
Fixing Pipes
I connected the pipes to a concrete wall and the wood joists on the roof, using iron profiles (takjärn). For screws, I found the “SKRUVSTIFT M8X80, Art. 87-797” from Biltema a good choice for installing the takjärns or directly connecting the pipe clamps.
For the KB pipes, I used 10 pieces of isolated pipe clamps from Billigvvs. They were expensive, but I feel safer against the condensation. For other pipes (around ball valves and filters), I used regular clamps with M10 studs that I cut to length with my tiger saw.
Filling and pressurizing the KB system
I failed to locate/rent a refilling station, therefore I picked up a submersible pump from Jula. I picked up the most powerful one (10 m head, 1 kW power) from their non-stainless steel range. I also bought 5 m of blue flat pipe material. The pump worked perfectly and the pipe fits the 3/4 filling station; however, 10 m head of water is equal to 1 bar, thus, to reach the 2.5 bar pressure, the installation manual from Bosch recommends a submersible pump with a head of 60 m, which I think mean an expensive and big submersible pump. A solution that I found was to pressurize the system by connecting a water hose (with a 3/4” Krankoppling) directly to the filling section and open the water until it reached the needed pressure (2.5 bar). The amount of water added will be equal to the compression of the expansion tank and negligible expansion of the pipes due to the pressurizing (i.e. negligible).
What would I do differently if I knew what I know today?
1. Would not spend too much time on calculating the number of needed joints. An estimated number x 2 + some alternative types (45 degree, male female, tight bend) (maybe four of each) would work fine. (you need three 90°bends to bring any given output to any given input). You can then return the unused items (at Hornbach or Rinkaby rör) after the project.
2. I made some solid sections of pipe (about 8 meters long). I think it would be more easy to make them or correct them if I had divided them into two sections by using compression coupling type valves or connectors.
3. I used long neck valves for the piping of the KB. I think the regular valves will work just fine (however, pay attention to buy something that is rated for -20°C).
4. Soldering needs complete separation from water for successful joints. Even water far away from the joint, can warm up, become steam and affect the joint. The best practice in my opinion is to separate the soldered sections from the water containing sources (e.g. heating circle, refilling line, etc..) and connect to water holders only with compression coupling. This will however need precision or room for play in the sections that you solder separately.
5. I would have brought the KB lines closer to the BVP by digging a longer trench outside of the house. I have rather long KB pipes inside that both did cost more to built and insulate and they take wall space that could be used for storage or other uses.
6. I would have ordered a 25 liter jug of concentrated KB liquid (ethanol mix) from the vvsbutiken along with the BVP. Other stores, such as RR also have KB liquid, but they don’t ship (only store-pickup).
7. I would have picked up the copper pipes myself from Hornbach or have bought it from Rinkabyrör instead of using Hornbach’s order and pickup. I got very scuffed-up pipes that seemed to be left-overs. This was annoying considering the price that I paid (about 2700 kr). I probably could have refused them on the spot or returned them when I noticed they were not good, but I don’t live very close to Hornbach and it was not easy for me.
8. I would have bought a good pipe cutter (I used Ridgid’s ratcheting one, but from Amazon) from the beginning, instead of starting the project with Biltema’s Chineseium.
9. The drilling company could have done the trench/drilling of the building wall for 3500 kr. I think I should have left this to them (although this meant waiting probably longer for them to find a suitable time in their schedule).
10. Although the ground was filled and soft, the trench kept getting wider when I tried to dig it with a showel/wellbarrow. I wonder if my life would have been easier if I had rented a small excavator.
11. Considering the amount of time that it took me to understand parts, select them and buy them, it probably would have been a good idea to take the 160 000 kr offer . An installer probably will keep the parts in his (or her… ) truck as standard, and will not need to think much about choosing them. While piping is an amazing skill, I don’t think that I would use it very often. All in all, this was an amazing project but it was time consuming.
Best Tools:
RIDGID 32573 Model 118 2-in-1 Close Quarters AUTOFEED Cutter with Ratchet Handle, 1/4-inch to 1-1/8-inch Tubing Cutter
After making spirals with my Biltema tube cutters, (and even resorting to my angle grinder and tiger saw to cut tubes), I bought this magnificent tool. You just need to position it on the tube, turn the black knob two turns, and then crank on the ratcheting handle. The tube will be cut in no time. I had in my mind to remove the inner cutter for the use in tight spaces, but I have not used it yet, as the ratcheting mechanism allows you to cut a pipe from a limited access angle. Of course, one could skip the ratcheting and cut the pipe with a continuous rotation.
I totally regret not buying this tool earlier.
Biltema’s burr remover
There is a video on youtube that shows that it is important to remove inner and outer burrs from cut pipes otherwise they can reduce the life of the copper pipes. I had bought a plastic round remover with three teeth from amazon, but it was a total garbage and it actually plastically deformed the corners rather than creating chamfers. I shelled out 80 kr and bought a simple pensile-like deburring tool from Biltema (Art. 20-327) which worked beautifully.
Biltema’s Plaströrsax Art. 12-195
Did a good job of cutting PE pipes for KB. It is also useful for cutting other pipes, such as electrical conduits.
Rems hot-dog 2
This was my workhorse that did all the soldering. It is a bit pricy, (cheaper used), and I don’t know If I should keep it or sell it. It did not have problem in heating the joints for soldering (if there was no water around).
One should always use gloves when soldering, as molten solder droplets may injure your skin.
I see that Hornbach sell cheaper burners for soldering, and they may be alternative options to this electrical system.
The original Bahco -Stockholm Swedish pipe wrench
To tighten the compression couplings (on the PP-copper) I had bought a 15” adjustable wrench from Jula for 150 Kr since my existing 12” inch wrench was not sufficient for >45 mm nuts on these couplings. I needed a second big wrench and Biltema had sold out its 18” wrenches, so I borrowed my neighbor’s big adjustable wrench (he had inherited it from his dad!). This was a big help as it was easily adjustable and very firm in gripping. (https://en.wikipedia.org/wiki/Bahco#/media/File:J_P_Johansson_1940.jpg)
I may buy something similar for myself (I will do so if I return the left-over parts).
Rotary hammer
I got a second-hand rotary hammer in the middle of the project. It was totally worth the price and helped me to drill needed installation holes, in addition helped me in demolition of some unneeded walls and sections later. If you are my type of person, you should get one for yourself. I had a drill with impact action, but the performance is completely different.
Finishing the project
I first soldered and pressure tested the KB pipes with my compressor. After that, I asked a friend to help me. He came Saturday, 8 AM
, and we removed the pellets burner. I had a palltruck and positioned the BVP (300 Kg) close to its final position. The most difficult thing was to move it to its final position. We finally muscled the BVP to a suitable position. We had to cut the cold water for half a day. Then we pushed on soldering the joints. By Sunday evening I was almost finished the bigger parts. Obviously after removing the pellets we did not have hot water. I kept fixing remaining parts and filled the system with KB fluid and pressurized the system. I also fixed the electrical connection (We had 20 A three-phase for the Pellets burner) and the connection to the outside sensors. overall, it took me a week to finish everything and the first shower with BV heating was particularly amazing (after a cold shower few days earlier
Redigerat:
Produkter som diskuteras i tråden

Liknande trådar
-
Rörfirman offererade 45 000 kr för att installera bergvärmepumpen - fakturerade mer än 90 000 kr
Artikelkommentarer -
Varför ingen värme i radiatorerna? IVT Bergvärmepump installerat 2018
Värme allmänt -
Hej, vi köpte ett hus, 50-talshus ,värmeolja som gäller, vill gärna lite förslag vad är bättre värme att installera ? Ser ut dyrare med bergvärme??
Fritidshus -
Konstiga tryck förändringar i nyinstallerad Daikin Geo 3 bergvärmepump.
Värmepumpar -
Installera vattenmantlad kamin som komplement till bergvärmepump
Värme allmänt